OCR (Optical Character Recognition)
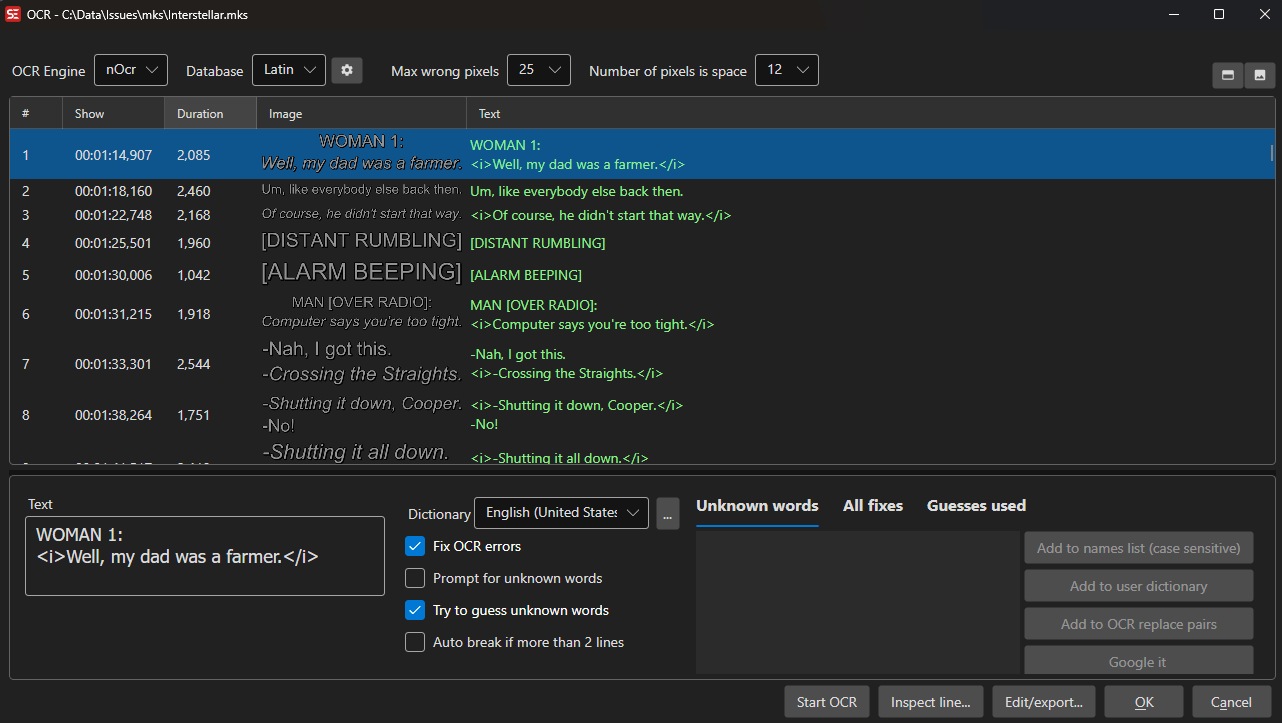
Subtitle Edit can convert image-based subtitle formats to text using OCR.
- Menu: File → Import → Image-based subtitle for OCR…
Supported Image Formats
- Blu-ray SUP (.sup)
- VobSub (.sub/.idx)
- DVD subtitles
- BDN XML
- Transport stream (DVB) subtitles
- Matroska embedded image subtitles (PGS, VobSub, DVB)
- MP4 embedded VobSub
- WebVTT with embedded images
OCR Engines
Tesseract
Open-source OCR engine with language packs.
- Download language packs via the OCR window
- Good general-purpose accuracy
nOCR (Nikse OCR)
Built-in trainable OCR engine.
- Train character databases for specific fonts
- Very accurate once trained
- Best for consistent fonts (like DVD/Blu-ray subtitles)
- Train nOCR database… - a database can also be trained from installed fonts instead of being taught during OCR. Open the nOCR database settings (the settings button next to the database list) and right-click anywhere in that dialog to reach it. Pick one or more fonts, a font size, the characters to train (or Import characters from subtitle file…), letter combinations that might end up in one image, whether to include bold and italic, and the number of line segments; Start training renders every character in every selected font and saves the result as a new
.nocrdatabase in the OCR folder, ready to pick from the database list - Optimize nOCR database… - in the same right-click menu. Removes the lines of each character that don’t tell it apart from similar characters (e.g. the stem that “i”, “l” and “j” share), using glyphs rendered from common subtitle fonts as the check: every similar character must still be rejected, and the character itself must still match as well as before. The database gets smaller and OCR faster, usually with fewer errors - the shipped Latin database is already optimized this way. It takes up to a minute; the original is kept as
<name>.nocr.bakin the OCR folder. Also available in seconv asseconv optimize-nocr <database.nocr> - Mixed italic in one image - when an italic letter touches an upright one and both end up in a single image, type the text with italic tags, e.g.
<i>i</i>t. The tagged part is italic and the rest upright, whatever the surrounding word is, so an italic line comes out as<i>... i</i>t<i>?</i>instead of nested tags. This works the same in Binary OCR
Binary OCR
Binary image comparison engine, listed as Binary image compare in the engine dropdown.
- Compares against a database of known character images
- Fast and accurate for known fonts
- Supports database editing, character history, max error percentage, and pixels-are-space tuning
Apple Vision
Built-in OCR on macOS using Apple’s Vision framework.
- macOS only; nothing to download or configure
- Good accuracy on clean subtitle images
Google Lens Sharp / Google Lens Standalone
Cloud-based OCR using Google Lens (free, but capped).
- Requires internet connection.
- The Standalone variant is Windows-only.
Google Vision
Cloud-based OCR using Google Cloud Vision API.
- Requires API key
Ollama
Local LLM-based OCR via an Ollama server (e.g. with a vision model).
- Default endpoint:
http://localhost:11434/api/chat
llama.cpp
Local LLM-based OCR using a llama.cpp-compatible server. Subtitle Edit can download llama.cpp and the model for you, or talk to a server you run yourself.
- Default endpoint:
http://127.0.0.1:8080/v1/chat/completions - Curated vision models, listed best-first for subtitles: GLM-OCR 0.9B (Q8_0, about 1.4 GB — the default, and the most accurate on subtitle images), LFM2.5-VL 3B (Q8_0, about 3.5 GB — a general vision model with flawless character recognition, slower and a bigger download; it uses its own prompt as long as the shared prompt below is unedited), PaddleOCR-VL 1.6 (about 1.8 GB, 109 languages), HunyuanOCR 1.5 (Q8_0, about 1.3 GB) and LightOnOCR 1B (Q8_0, about 1.2 GB — the least accurate and much the slowest). Custom vision models also appear in the list: put the
*.ggufin the llama.cpp models folder together with itsmmprojvision projector, named eithermmproj-<file>.ggufor<file>-mmproj.gguf(the two naming schemes used on Hugging Face). A*.ggufwithout a projector next to it is not offered — it cannot see the image - The settings dialog has a download/update button for the llama.cpp engine itself; the dot next to it turns amber when a newer build than the one installed is available
CrispEmbed
Local OCR engine with multiple model backends (free/open source).
- Backends: PP-OCRv6, GLM-OCR, GOT-OCR2, Qwen3-VL-2B, and DeepSeek-OCR-2
- PP-OCRv6 is a text detector plus recognizer rather than a vision language model, so it needs only two small files (about 79 MB in total) and is the quickest way to get started
- DeepSeek-OCR-2 is the most accurate backend on subtitle-style images; it ships a single
q4_kmodel of about 2.31 GB - GLM-OCR, GOT-OCR2 and Qwen3-VL-2B each offer a smaller
q4_kand a higher-qualityq8_0model (from about 445 MB for GOT-OCR2 q4_k up to about 2.29 GB for Qwen3-VL-2B q8_0) - The engine and models are downloaded from the OCR window on first use
Mistral OCR
Cloud-based OCR using Mistral API.
- Requires a Mistral API key
Paddle OCR Standalone / Paddle OCR Python
Local OCR engine, based on Paddle OCR 3.7 with the PP-OCRv6 recognition models.
- Standalone (downloadable CPU/GPU builds) is available on Windows and Linux.
- The Python variant works anywhere a Paddle OCR Python install is available. It uses the same downloaded models, so it needs
paddleocr3.7 or newer - older versions do not know the PP-OCRv6 model names.
Engine Setup Notes
- nOCR databases are stored in the Subtitle Edit OCR folder and can be created, renamed, edited, and deleted from the OCR window.
- Binary OCR databases use image comparison and are edited separately from nOCR databases.
- PaddleOCR can download standalone CPU/GPU builds and support files on Windows and Linux, or use a Python installation.
- Ollama and llama.cpp are useful when you want local AI-based OCR and have a vision-capable model available.
- CrispEmbed is fully self-contained: pick a backend and model in the OCR window and Subtitle Edit downloads what is needed.
- Mistral OCR and Google Vision require cloud credentials.
How to Use
- Open an image-based subtitle file
- The OCR window opens automatically
- Select an OCR engine
- Configure engine-specific settings
- Click Start OCR
- Review and correct any errors
- Click OK to import the text subtitles
After OK, the matching video is opened as well (unless auto-opening the video is turned off in the settings): a container source (.mkv, .mp4, .ts) is opened as the video itself; for a stand-alone image subtitle (.sup, .sub/.idx, …) a video passed together with the file (drag and drop, command line) is used first, then the video the subtitle was last opened with, then a video file with the same name next to the subtitle.
Language Auto-detection
When the OCR window opens, the OCR language for every engine - and through it the spell check dictionary - is pre-selected from the source’s declared language: the stream language in a VobSub .idx, the track language of a Matroska or MP4 subtitle track, or a language tag in the file name. Two file-name patterns are recognised: a bracketed ISO 639 code such as movie_track3_[dut].sup (the naming used by Subtitle Edit’s own Matroska track export; the last valid code wins), and a trailing dot-separated tag such as movie.nl.sub or movie.dut.forced.sub - the hi, sdh, cc and forced markers are skipped, only the last two remaining tokens are considered, three-letter codes must be lowercase, and hi is read as hearing impaired rather than Hindi. A detected language wins over the last-used one; a source without language information keeps the previous selection.
Options
Checkboxes below the engine settings:
- Fix OCR errors, Prompt for unknown words, Try to guess unknown words — Shown once a dictionary is loaded
- Auto break if more than X lines — X is the Max number of lines rule from Settings
Toggle buttons above the image:
- Auto-detect ASSA alignment — Capture top alignment
- Image pre-processing — Opens the pre-processing settings
- VobSub/DVD colors… — VobSub/DVD input only
- Fallback OCR database — nOCR and Binary image compare only
- Show only forced subtitles — Only when the file has forced subtitles
Subtitle List Menu
Right-click the subtitle list for:
- OCR selected lines
- Inspect line… — nOCR and Binary image compare only
- Show image, Save image as…, Copy image to clipboard
- Delete, and Fill selected lines with clipboard text when several lines are selected
- Find…, Replace… — See Find and Replace
- Italic, Bold
- Edit/export…, Import text from subtitle…, Export text as subtitle…
- Save all images with HTML index… — See Saving the Images
Find and Replace
Find… and Replace… (subtitle list or text box right-click menu, Ctrl+F / Ctrl+H) open the same Find and Replace windows as the main window, so text can be searched and fixed while the image is still next to it. A match selects its line and highlights the text in the text box. Replace all also updates the lines’ highlighted OCR text in the list.
Saving the Images
The subtitle list’s right-click menu has Save all images with HTML index…. Pick a folder and
Subtitle Edit writes index.html plus images/0001.png, 0002.png, … — every subtitle bitmap
next to the text OCR produced for it, which is the quickest way to proof-read a run against the
originals.
The page is self-contained (no external css, js or fonts), so it opens straight off the file system. It follows the reader’s light/dark preference, with an Auto/Light/Dark override, and adds a text filter, an “only lines without text” filter for spotting images that produced nothing, a dark/light/checkerboard backdrop for the transparent bitmaps, click-to-zoom, and each line’s number, time codes, duration and image size.
Keyboard Shortcuts
General
| Shortcut | Action |
|---|---|
| Escape | Cancel OCR / Close window |
| Ctrl+G | Go to line number |
| Ctrl+F | Find |
| Ctrl+H | Replace (Cmd+Alt+F on macOS) |
| F3 / Shift+F3 | Find next / Find previous |
| Ctrl++ | Zoom in (images in grid) |
| Ctrl+- | Zoom out (images in grid) |
| F1 | Show help (default key, changeable) |
Subtitle Grid
| Shortcut | Action |
|---|---|
| Ctrl+I | Toggle italic formatting |
| Ctrl+P | View selected image (use arrow keys to navigate) |
| Delete | Delete selected line(s) |
| Home | Jump to first line |
| End | Jump to last line |
| Double-click | Inspect line (nOCR/Binary OCR only) |
Unknown Words List
| Shortcut | Action |
|---|---|
| Enter | Jump to subtitle line containing the selected unknown word |
Note: All shortcuts can be customized. Go to Options → Shortcuts to view and change key bindings.
Pre-processing
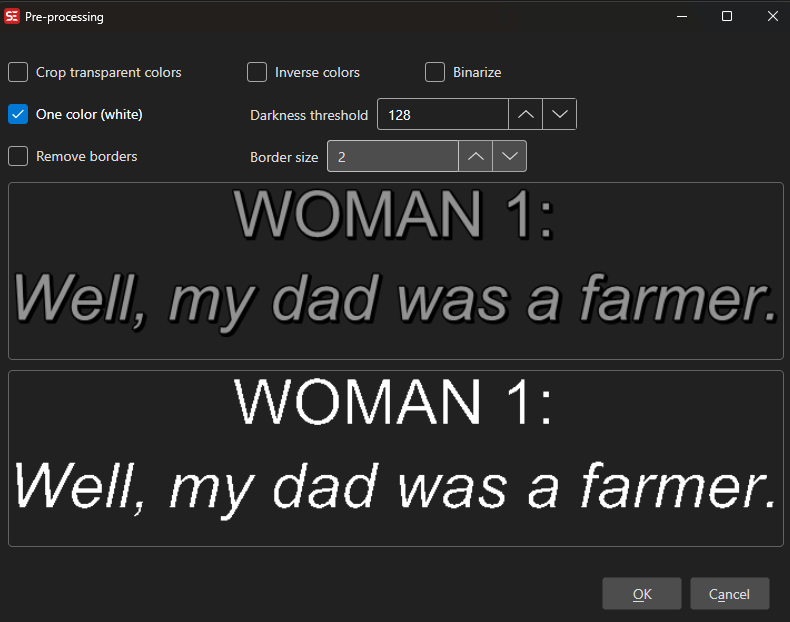
Before OCR, you can apply image pre-processing via the Image pre-processing toggle button in the OCR window (it shows as pressed while any pre-processing is active):
- Crop transparent colors
- Remove borders (with configurable Border size)
- Inverse colors
- One color (white) (keep pixels brighter than a Darkness threshold)
- Binarize (convert to black/white using Otsu thresholding)
The settings are remembered between sessions and applied automatically the next time you open the OCR window. Reset in the Pre-processing window sets all options back to their defaults (all off, border size 2, darkness threshold 128).
Batch OCR
Batch Convert can process image-based subtitle files with OCR. Subtitle Edit 5 includes Binary OCR in Batch Convert and can auto-detect several nOCR/Binary OCR settings such as language and pixels-are-space values.
For VobSub files, Batch Convert isolates the glyph color before OCR (on by default, configurable in the Batch Convert settings): the subpicture is rebuilt as a crisp black-on-white bitmap from pixel frequency, so outline and anti-alias colors no longer melt adjacent characters together.
For command-line workflows, see Command Line (seconv), which documents OCR engines and options for headless conversion.
Unknown Words
When the OCR engine encounters uncertain characters, you can:
- Choose from suggested alternatives
- Type the correct text
- Add to the OCR fix dictionary for automatic correction
The unknown-words list in the OCR window has buttons for the selected word: Add to names list (case sensitive), Add to user dictionary, Add to OCR replace pairs and Google it.
What is remembered
Some of the choices in the unknown-word prompt are saved to disk and reused on later OCR runs; others only last as long as the OCR window is open.
| Choice | Remembered? | Stored in |
|---|---|---|
| Change all | Yes | {language}_OCRFixReplaceList.xml |
| Add to names list | Yes | {language}_names.xml |
| Add to user dictionary | Yes | {language}_user.xml |
| Skip once | No | — |
| Skip all | No — current OCR session only | — |
“Skip all” is deliberately temporary. It silences a word for the rest of the current OCR session and is forgotten when the OCR window closes, so a mis-click never has lasting consequences. If you want a word to be accepted permanently, use Add to user dictionary (or Add to names list for proper nouns) instead, and use Change all for a correction that should be applied automatically from now on.
OCR Fix Replacement Lists
Subtitle Edit uses language-specific XML files to automatically correct common OCR errors. These files are named {language}_OCRFixReplaceList.xml (e.g., eng_OCRFixReplaceList.xml for English) and are located in the Dictionaries folder.
See the example file: Dictionaries/eng_OCRFixReplaceList.xml
XML Structure
The OCR fix replacement list contains several sections that handle different types of corrections:
1. WholeWords
Replaces entire words that match exactly. This is the most common section for fixing OCR mistakes.
<WholeWords>
    <Word from="tñere" to="there" />
    <Word from="ri9ht" to="right" />
    <Word from="0f" to="of" />
    <Word from="alot" to="a lot" />
    <Word from="becuase" to="because" />
</WholeWords>
Use cases:
- Common character misrecognitions (e.g.,
0→o,l→I) - Typical OCR errors for specific words
- Common misspellings that OCR produces
2. PartialWordsAlways
Replaces character sequences within words, always applied without spell checking.
<PartialWordsAlways>
    <WordPart from="¤" to="o" />
    <WordPart from="lVI" to="M" />
    <WordPart from="IVl" to="M" />
</PartialWordsAlways>
Use cases:
- Fixing specific character combinations that are always wrong
- Removing special characters that OCR incorrectly inserted
3. WholeLines
Replaces entire lines that match exactly (including formatting tags).
<WholeLines>
<Line from="[chitte rs]" to="[chitters]" />
<Line from="Hil' it!" to="Hit it!" />
<Line from="<i>Hil' it!</i>" to="<i>Hit it!</i>" />
<Line from="ISIGHS]" to="[SIGHS]" />
</WholeLines>
Use cases:
- Fixing common sound effect text
- Correcting specific phrases that always appear incorrectly
4. PartialLinesAlways
Replaces text fragments within lines, always applied without spell checking.
<PartialLinesAlways>
    <LinePart from="Apollo 1 3" to="Apollo 13" />
    <LinePart from=",.," to="..." />
    <LinePart from=" lt " to=" it " />
    <LinePart from=" lf " to=" if " />
</PartialLinesAlways>
Use cases:
- Fixing common spacing issues
- Correcting punctuation errors
- Fixing common word fragments
5. PartialLines
Replaces text fragments within lines (may be spell-checked).
<PartialLines>
    <LinePart from=" /be " to=" I be " />
    <LinePart from=" aren '1'" to=" aren't" />
    <LinePart from=" aren'tyou" to=" aren't you" />
</PartialLines>
6. RegularExpressionsIfSpelledCorrectly
Uses regex patterns to fix errors, but only applies the replacement if the corrected word is in the dictionary.
<RegularExpressionsIfSpelledCorrectly>
    <!-- Fix lowercase 'l' to uppercase 'I' if result is a valid word -->
    <RegEx find="\bl([A-Z]+)\b" spellCheck="I$1" replaceWith="I$1" />
    <RegEx find="\b([A-Z]+)l\b" spellCheck="$1I" replaceWith="$1I" />

    <!-- Fix possessive forms: David's, there's -->
    <RegEx find="\b([A-Z][a-z]+)['']s\b" spellCheck="$1" replaceWith="$1's" />
    <RegEx find="\b([a-z]+)['']s\b" spellCheck="$1" replaceWith="$1's" />

    <!-- Fix missing spaces: ofDavid → of David -->
    <RegEx find="\bof([A-Z][a-z]+)\b" spellCheck="$1" replaceWith="of $1" />
    <RegEx find="\bin([A-Z][a-z]+)\b" spellCheck="$1" replaceWith="in $1" />

    <!-- Fix 'l' in brackets: [GRlNDlNG] → [GRINDING] -->
    <RegEx find="\[([A-Z ]*)l([A-Z ]*)\]" spellCheck="[$1I$2]" replaceWith="[$1I$2]" />
</RegularExpressionsIfSpelledCorrectly>
Attributes:
find: The regex pattern to matchspellCheck: The text to check against the dictionary (use$1,$2for capture groups)replaceWith: The replacement text if spell check passesreplaceAllFrom/replaceAllTo: Optional character replacement before spell checking
Use cases:
- Fixing lowercase
lto uppercaseI(e.g.,lTEM→ITEM) - Correcting apostrophes in possessive forms
- Fixing missing spaces after common words
- Pattern-based corrections that should only apply if the result is a valid word
Creating Custom Rules
To add your own OCR fix rules:
- Open the appropriate language file:
Dictionaries/{language}_OCRFixReplaceList.xml - Add entries to the relevant section based on the type of error
- Save the file
- Restart Subtitle Edit for changes to take effect
Tips:
- Use
WholeWordsfor simple word replacements - Use
RegularExpressionsIfSpelledCorrectlyfor pattern-based fixes where you want to verify the result is a real word - Test your regex patterns carefully to avoid unintended replacements
- The replacements are applied in the order they appear in the file